Showing posts with label Decorating the Home. Show all posts

Monday, December 13, 2010

Gathering Greenery to decorate the home at Christmas


I am so blessed here at Eight Acres of Eden to be surrounded by abundant, verdant greenery. Just perfect for setting out at Christmas time around the home, bringing the gifts of nature inside to enjoy for a time. There is so much to choose from - it is just a matter of grabbing a basket off the pot hanger, picking up a pair of scissors, enlisting the help of a volunteer 'gatherer' and stepping outside the door!


After recent rain the garden was flourishing - the magnolia's shiny green leaves are always lovely in arrangements and the roses have started to bloom - the girls wanted to pick the flowers but were happy to follow mum's instructions and leave them in the garden to enjoy!


They did take the time though to stop and smell the roses!


This is the selection of greenery we brought inside to decorate the top of the Stanley Stove which is the focal point of our family/dining room. Of course it is summer here - the fire will not be lit again until winter so I can decorate the stove to my heart's content without fear of setting anything alight!

This is a list of my top three favourite items of greenery to use at Christmas time


1. Cypress snipped from my favourite tree at this property - a kashmiri cypress which graces one side of the main entrance to my home. It is so tall and majestic. I love its sage green fronds which drape so beautifully. It is perfect for setting out along the edges of shelves.


2.Cedar - I feel so blessed to literally live 'beneath boughs of cedar'. The tall tree that stands on the other side of the front rocky path which leads to the front entrance is a Himalayan cedar. It's spiky needles really do bring Christmas inside and are the perfect finishing touch for the loose natural arrangements that I prefer. I used to hang Christmas lights in this tree but it has now grown too tall - I enjoy its splendour unadorned all year round!


3. Bay Leaves - I planted this bay tree when we first moved to this property. It has flourished and I resisted the temptation to turn it into a standard bay tree - this is a forest property, it is wild and untamed - a manicured garden with straight lines and hedges and rows of flowers would not be quite right and I don't mind - I don't have to keep trimming it back all the time to keep it neat. An occasional pruning and I have bay leaves to pop into a casserole in winter, to add to jars of dry ingredients to keep weevils at bay (excuse the pun!) and at Christmas I can gather armfuls of leaves for decorative purposes.

There are other conifers I can snip from, there is also an olive tree which has never fruited but I like to use its branches in arrangements and the tips for trimmings - tuck a sprig under a ribbon tied around a jar of Christmas preserves or biscuits or tuck into a napkin. I can also find lots of ivy to wrap around the handles of wicker baskets - it is a weed that needs to be pulled out but a useful weed for the Christmas decorator!


Here is the result of our greenery gathering expedition - my Stanley stove affectionately known as 'Stan' bedecked in greenery for the Christmas season. This was my trial run - after a few days the greenery will wilt and I will remove it - there is plenty more to replace it. I occasionally make longer lasting more structural arrangements using oasis taped into trays but when time is limited I simply layer, drape, tuck and scatter! I think I prefer this more natural look for my home. I plan to gather some greenery on Christmas Eve morning and in the evening as we sit down to dinner I will light all the candles!


A closer look


I love my enamel kettle which is the perfect match for the Stanley. I hope to add to my white enamelware collection - in the gift store where I found my kettle, there is a sweet milk jug and a small bucket which I can see now filled to the brim with green or red apples!


I love these little metal white tea- lights with their dragonfly design. I found them at a garage sale for just $2. I hope you have enjoyed seeing a corner of my home and how I use what is freely available to me from my garden to decorate at Christmas time. I believe nature makes some of the best decorations! Don't have enough baubles to pile up in bowls on your Christmas table? How about apples? Or oranges? Nuts from your pantry? Cinnamon sticks and snippets of greenery from the shrubs in your garden or ask permission from a neighbour with a garden of hedges that need to be trimmed for their prunings!


Don't have time to drape the banisters of your staircase or sufficient greenery to make swags for your mantel piece? Don't own a chandelier? Why not just add sprigs to an afternoon tea tray or tuck greenery into napkins - a little touch here and there - you will be surprised at the difference these simple embellishments of green will make to you home! I'm hoping to make some more of these gingerbread wreaths this week - the chocolate leaves and a few fronds of cypress are all that is needed to make a simple but stunning gift - and so much easier than constructing a gingerbread house!

Happy Gathering!

With Love and Joy,

Ann

Sunday, December 5, 2010

Choosing a Colour Scheme for your Christmas Tree


Last year I started this blog to show you how I create a beautiful Christmas in a beautiful place. I want to do the same this year but there is no need to repeat the tutorials I posted last year. You will find the 'how to' posts in my archives. I'm hoping to have a simple but beautiful Christmas this year - recreating the traditions I have always held dear such as trimming the tree and making my own bon bons but not allowing myself to be distracted by decorating dilemmas and spending money in an attempt to keep up with the trends and have a fashionable Christmas - I've realized I prefer the old fashioned kind of Christmas and that reflects my choices for the colour scheme I chose for my tree this year.


I have a collection of tree decorations in the traditional red, green and gold associated with Christmas. I was so tempted to dispense with the red and go for a more modern look but realized that those decorations now have memories attached. The red bead garlands my twin daughters adorned themselves with when they were two. The cream and gold 'Russ' angels that my girls loved from the moment we saw them on sale in the store. They will come out every year so the traditional colour scheme has to stay - and I've realized that green is the perfect background for red. Think of a field of red poppies, a garden bed of red tulips, the red native flowering shrubs of Australia. All the work of the Master Designer So eye-catching, vibrant and nothing says Christmas to me more than red and green.


Garlands of beads - I have had these in my collection for over 10 years they last so much longer than tinsel and do not drop strands onto the floor!


So the gold and lime green tree I saw in a magazine is staying there - on the pages of a magazine but lime green? I love that idea for my colour scheme and green is my favourite colour - why not red and green with a twist of lime green? Be inspired by the images you see and love but use them and work them into what you already have to suit your home and lifestyle. Urns of apples at the door? Lovely but 1. I don't intend to buy urns to do this and 2. I might as well put up a sign saying 'Welcome possums and any other bush wildlife especially rats - and attracting rats means attracting snakes! I think I will not try this at my home!


Each year I add to my collection just one or two decorations and with the thought of lime green and Granny Smith apples in my head but knowing I would not hang real apples on the tree in our humid climate I opted for the baubles - two sets of lime green from Target on sale at $3 a box. Total cost of updating the tree for this year $6! And having just added the lime green baubles to the tree this morning I really think it has given the tree a 'lift', sets off the red and coordinates with the gold too!


So thinking of updating your tree decorations? Don't abandon the whole of your collection - replace ragged tinsel, shabby or broken decorations by all means but is there something you can add to your collection - an extra colour? Some handmade decorations? Would gingerbread stars or paper icicles give your tree a homemade rustic touch and occupy the children over the holidays? Don't be wasteful, spend money wisely and don't be in too much of a rush to keep up with the trends - an ultra modern black Christmas tree with its silver decorations might look good on the page of that design magazine in its minimalist setting but look totally ridiculous in the corner of your living room with the presents sent by nana underneath wrapped in santa paper! Think of how everything goes together and ask yourself is this going to work with everything else? Will it suit my home? Even if it is just one tree decoration you are considering purchasing, ask yourself these same questions - that dollar saved is after all a dollar saved!


And don't forget to recycle decorations from previous seasons. These Christmas cones were created from old Christmas cards last year for a unique handmade advent calendar. This year the cones have been hung on the tree and I intend to fill some of them with little surprise gifts - bags of homemade popcorn are just one thought. The one in this picture holds a spice bag - you pop the spice bag into a pot of simmering hot water on the stove and fill your home with the traditional smells of Christmas - spicy cinnamon, nutmeg and cloves. A neat little gift idea too and so simple to create.

The Christmas cones also make neat little containers for wrapped baked biscuits and sweet treats such as truffles - a lovely little gift for a friend. I like to make biscotti for the cones - they are the perfect fit for the narrow cones.

I'm making more of these this year. I love to make truffles and biscotti at Christmas and of course gingerbread. Traditions extend to the kitchen - there is something about Christmas and traditions isn't there? It's how I intend to keep my Christmas simple and uncomplicated - a new recipe here and there but some traditions cannot be replaced - the children are already asking 'When are we going to make gingerbread? - we always make gingerbread at Christmas!'


It is also why my twin girls insisted on putting up the tree on their birthday the first day of Christmas. How exciting it is for them that they realize that the arrival of their birthday marks the start of the preparation of our home for Christmas when we celebrate the birthday of a Saviour.

What colour scheme do you have for your home? What are the traditions of your family Christmas and how do you update/modify them without going to great expense or being a slave to fashion and trends?

With Love and joy and a twist of lime green,

Ann

Tuesday, December 8, 2009

A Christmas Table Centrepiece using Candles and Natural Materials


I am captivated by the glow of candle light at Christmas time and I love to create displays using candles. In previous posts I have shown you some of my elaborate wreaths which do take some time and effort to make but today I want to show you a simple, natural arrangement that took just minutes to create using items which I had to hand around my home. You do not need oasis, florists wire or any experience in floral arrangement! You could create a display like this for your Christmas table just before you sit down to dinner - it is that easy!
The perfect finishing touch - my favourite 'succulent' candles - I use these candles all year round and have only ever seen them in discount stores!

Here are the natural materials I gathered. I raided the fruit bowl for green Granny Smith apples. You could use red apples, pears, oranges, mandarins, cherries - just select fruit in uniform sizes. I snipped some greenery ( sprigs of cedar) from my garden. Darker green leaves are a lovely contrast to the lime green of the apples. If you do not have a garden, consider snipping a few cuttings from your Christmas tree - you do not need much greenery for this arrangement.
Nuts (not shelled) are the other item I raided from my pantry. Many households have nuts in their Christmas pantry. Macadamias or hazelnuts are ideal, you could use walnuts - again, whatever you have to hand.
My younger children gathered some small pine cones at the local park yesterday - just a small handful was all I needed. I already had cinnamon sticks in my craft cupboard but these are entirely optional and not integral to the arrangement.


You will need a large, shallow, round dish or bowl with a flat bottom in the centre. I bought this shimmery, gold bowl at a discount store for $15. It is perfect for this type of arrangement. It has a diameter of approximately 30 cm. If you have a square or rectangular platter, you could create a similar arrangement with smaller fruit such as cherries, strawberries or grapes.


Step 1. Place 3 or more church candles in the centre or you could use just one thicker candle. I like the effect of several candles flickering or more if you have a larger bowl or platter. Shorter candles are more suited to this type of arrangement than taller ones, especially if it is for a table where people will sit down to socialize and dine. Use whatever colour candles you wish and coordinate with your table linen or other decorations.


Step 2. Place the apples around the candles. I used seven apples for my bowl. Using apples or oranges means your arrangement will last for several days or longer.


Step 3. Next add the pine cones arranging evenly around the bowl. I love the contrast of the texture of rough pine cones next to the smooth, shiny skin of the apples.


Step 4. Pour nuts into the gaps between the apples and pine cones. Try to use nuts that are a lighter shade than the cones that you use.


Step 5. Tuck sprigs of greenery under the pine cones around the perimeter of the bowl. You may wish to replenish it, if it starts to wilt and it is so easy to do this when you do not have to pull it out of a block of oasis - just lift up the pine cones and replace!


Step 6. Finally, if you wish, arrange some cinnamon sticks on top of the apples. I have also used some extra candles - my succulents - use real or faux succulents if you do not have candles such as these. I just love how the texture of these candles 'mirrors' the texture of the pine cones.


And now the hardest part - deciding where to display the arrangement! It would be a perfect centrepiece for my Christmas table. It looks good on my kitchen island bench, particularly as it has fruit and nuts from the pantry. It would equally, be a good choice for a buffet table or dresser. A low arrangement such as this would also be ideal for a coffee table as it is a display you look down upon. I think it contrasts well with a timber table and therefore, I have chosen to place it at one end of my hall table.


I also wanted to give you a glimpse of the display I have created here. I have been searching for an ornate frame for my reproduction print of an old map of New Zealand for some time. Last weekend I found the frame - at a garage sale for $5! This is another reflection of my family's heritage.( I am married to a New Zealander of Maori descent!)


Another recent garage sale find - wooden letters that spell out PEACE. They were already painted gold and cost me $2.50! I think I may leave these out all year round for peace is something I truly want to experience in my home. Peace on earth is not just a message for the Christmas season but something we can also have in our hearts and in our homes when we meet and enter into a personal relationship with the one who brings real and everlasting peace - JESUS! The reason why I celebrate Christmas with such a passion!

I hope you have enjoyed visiting my home today and gained some inspiration for creative displays using candles and the gifts of nature. More ideas coming soon!

With Love and Joy,
Ann

Sunday, December 6, 2009

Time to Trim the Tree Part 2 Beads and Bows, Garlands and Gifts.

Today I have been 'dressing' the corner of my formal living room where my Christmas tree stands, bedecked in all its traditional colours of red, green and gold next to the cast iron fireplace.

This is the perfect opportunity to show you how I 'finish' off my tree with beaded garlands and bows and introduce to my angel - she needs a name and I'm giving you the opportunity to name her - I'll choose my favourite - so leave me a comment and suggest a name for the angel who has graced the top of my tree for almost ten years! I'm also going to show you my fireplace display and give you a glimpse of some of the gifts I wrapped today to place under the tree. I hope to do a separate post on gift wrapping but with my baby ready to arrive during Advent, I should not be 'promising posts' - so I'm showing you some of the ways in which I embellish my gifts for my family - always wrapping them with love of course!


This is my lovely fireplace which warms our home during the winter months; of course, it is summertime in Australia. I am English born and have experienced the occasional 'white Christmas'. Decorating my tree in traditional style is one way in which I express my heritage - I think it is lovely to incorporate some traditions from your 'homeland' into your Christmas celebrations. This is why I have not been tempted to go for a totally 'Australian' look - no 'surfing santas' in this home, though I do have a ceramic kangaroo ornament hanging from one of the branches, I use gum nuts on my wreaths and my dining room has a different 'cooler' colour scheme of white, green and silver which is better suited to the strong Australian light.

After the lights, baubles and ornaments are hung on the tree, I move onto the beaded garlands, draping them as gracefully as I can. I admit I take some time to do this, I want the garlands to drape evenly in 'gentle, even waves'. I am never fully satisfied and have to set aside any 'perfectionist tendencies' or I would spend all day on this! I have always added bows to the ends of the branches using ready wired bows which are designed for this purpose. Sometimes I also add in silk flowers but as my collection was a little faded I have not used the silk 'Christmas lilies' this year. I have seen some beautiful trees adorned with silk flowers instead of bows in the December issue of NZ House and Garden magazine. This is something I might try next year!


And here she is - introducing ---- Oh yes, she is the Angel with no name! Please suggest a name. She's a Kiwi by the way! I purchased her from a well known NZ department store 'Farmers' where I bought many of my decorations in their wonderful post Christmas sales.


This is a glimpse of the gifts and decorations under the tree. I don't see the reason in decorating a tree if you are not going to place any gifts under the tree! It all adds to the excitement and anticipation of Christmas. My twin girls have opened the occasional gift before (usually the wrong one!) but now at four are old enough to know they have to wait - we are counting down the days to Christmas with our homemade Advent calendar and they are receiving tiny gifts when it is their turn but just to be sure, they check with me each morning asking 'Christmas today?' and sigh when I say 'No, not today ' and tell them to go and count how many days to go using the calendar.


I do like to coordinate my gifts with the tree. The gifts that will be placed under the tree are wrapped in gold and I have added embellishments which reflect how I decorate my handmade wreaths. I use ribbon, silk leaves and flowers, cinnamon sticks and even silk butterflies. Usually, I decorate at least one gift for each family member in a more elaborate way. I place these at the front of the present pile for greatest effect. On others I just use ribbon or a simple finishing touch such as a gold star or a glittery decoration. Any gifts I receive from family which do not match in, go into gift bags or boxes. Tucked away in the set of 3 gold boxes tied with red ribbon are gifts from my mum in the UK. This gives the recipient an extra surprise. I usually add a tag to the box 'Gifts from Grandma'. So do not be afraid to place those gifts from grandma which she wrapped in 'Mickey Mouse' Christmas paper into a gift bag. Don't waste time re- wrapping them (and possibly offend grandma in the process!) if they do not tie in with your decor, just disguise them! There are so many inexpensive gift bags and boxes available at the discount gift shops or better still, reuse a plain paper bag and have your children decorate the outside with cards recycled from last year. I have used the same set of gold 'hat boxes' to 'hide' gifts for many years. I just use a different bow and decorate the lid of the top box for variation.

I gathered some greenery from just outside my front entrance (I am so blessed to have this decorating resource a few steps away!) to decorate my fireplace - remember the fire will not be lit! I have also tucked sprigs of conifer around the gifts under the tree. Other items I have to hand are pine cones gathered from a recent trip to a local park, cinnamon sticks, green apples from the fruit bowl and a set of coloured, glass tea light holders.


I purchased these tea lights at the 'Reject Shop' for $1 each a few years ago. I use adhesive gold letters to spell out 'Faith, Hope, Love, Joy, Peace' and of course 'Jesus' who brought us all these when He arrived as a baby in a humble stable at Bethlehem all those years ago. I have set out a few of the figurines from a tiny Nativity set - another reminder for my children of why we celebrate Christmas. My main Nativity set, my Willow Tree figurines, a very special gift from my husband, are the focus of my Christmas display on the timber table in my hall. I will show you this display in another post.


I hope you have enjoyed visiting my home and seeing just a corner of my formal living room. The lights have been twinkling for several weeks now and I have loved spending evenings with my family relaxing in this room. Tonight I will enjoy it even more when I sit down and watch one of my favourite shows - You might be surprised, it's not 'Better Homes and Gardens' but 'Man versus Wild', (the ultimate 'How to Survive' show) on SBS. My children love this show too and I enjoy being with them, watching something of excellence which is also educational. 'Bear' has not yet done an episode on 'How to survive the Christmas season' but my advice would be to simply enjoy the preparations, start tomorrow, if you haven't already and don't leave it all to the last week. For further inspiration and ideas visit me again at 'Christmas at Eden' but just remember if I am not here I'm probably having a baby!

With Love and Joy,
Ann

Tuesday, December 1, 2009

Time to trim the Tree Part 1 - Lights, Baubles, Action!


I always like to have my tree up and decorated by the 1st December but this year my tree has been up since the second week of November! Why so early you ask? - well several reasons 1. I wanted to do posts for this blog on how to trim a tree 2. I adore Christmas and simply couldn't wait, so I chose to celebrate my birthday by decorating my tree! 3. I am almost 38 weeks pregnant and standing and stooping to hang ornaments and twirl lights and garlands around branches for long periods during our current heatwave would have not helped my poor, swollen ankles! I am so pleased I chose to set up my tree earlier than usual - I feel organized and prepared knowing that one of the bigger tasks involved in decorating for Christmas has already been accomplished.
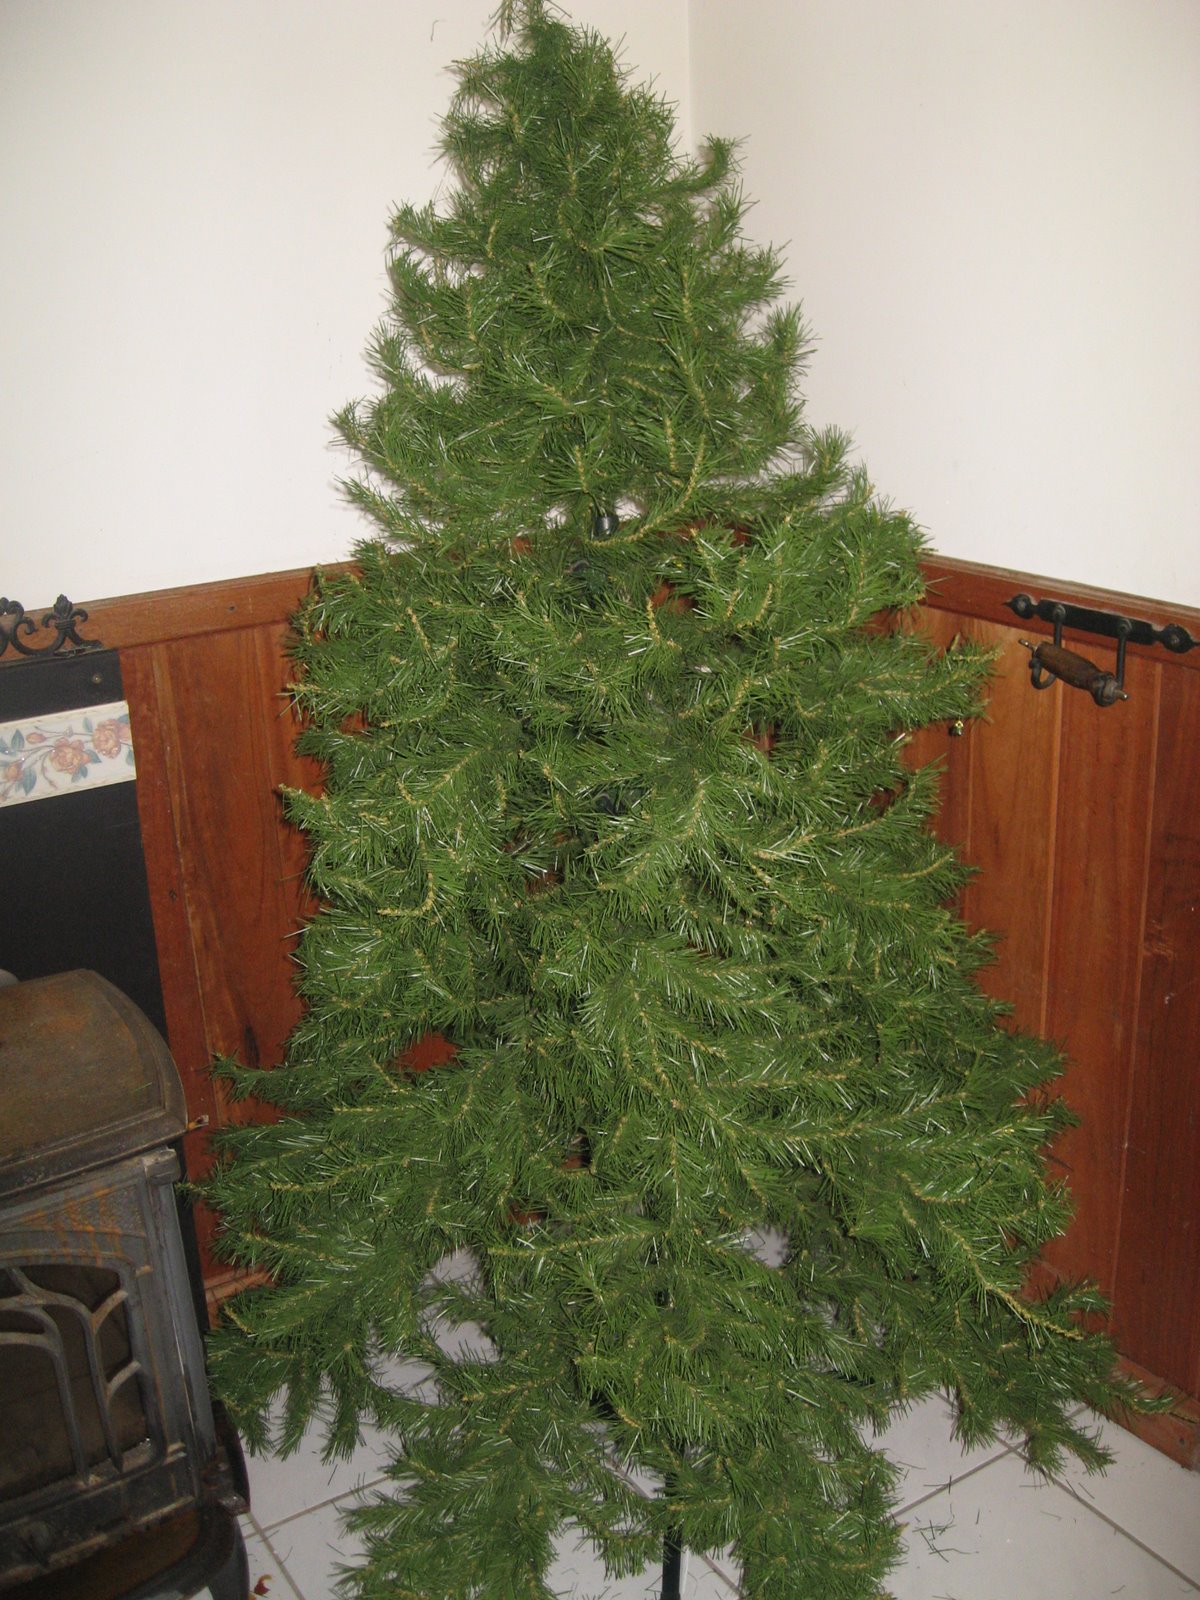
This is my tree, unadorned and set out in the spot I chose for this Christmas, next to our cast iron wood burner in the corner of our formal living room. Remember - I am in Australia - it is summer here and the fire will not be lit, otherwise, it would not be so close to the fireplace!

It is a faux tree and I have owned it for ten years. It is starting to look a little tired, the needles are starting to drop off and I hope to replace it with a taller, bushier spruce or conifer but not this year. Maybe, I will purchase one in the New Year sales. This tree was purchased in a Boxing Day sale - we were disappointed to find all the trees had been sold so I took the liberty of asking a sales assistant whether I could purchase the tree which stood decorated at the front of the store at the 50% off price. They said yes and just asked us to return a few hours later so they could remove the decorations!

I always used to have a real tree and I loved our family tradition of visiting the Christmas tree farm to choose a tree but I was running Christmas decorating seminars out of my home during November and finding that my tree was just not lasting until the end of December. One year (the year I was expecting a baby) I had to take down my tree the week before Christmas and find a replacement - a very sorry looking specimen- a self-sown pine seedling cut down from the side of the road. On the morning I chose to decorate my new 'weedy' tree I went into labour and was hanging ornaments in between contractions! By morning tea time, I had a decorated tree and even managed to get the angel on the top - it was not my best decorating effort but if you have ever tried to decorate a tree during labour you would understand why! Shortly after this, I had made my way to the bathroom, my husband had come inside after being out on the farm and following a few more powerful and painful contractions and with just one push, my son was born and delivered into the hands of my husband! The midwife was still on her way but I was ecstatic - my fourth child had arrived in time for Christmas and my tree was decorated!

After this experience, especially as I surveyed the pathetic pine I said to my husband - 'That's it - no more real trees!' I have found too, that the faux tree is much easier to decorate, it holds the ornaments well and the branches do not droop. The effort of keeping a tree alive is avoided and the needles do not endlessly drop all over the floor. If you want the scent of a real tree you can actually buy a pine scented spray. I believe 'Crabtree & Evelyn' make a beautiful 'Christmas scented' room spray which can be used for this purpose.


Now I have shared my most infamous tree decorating story, I can show you how I decorate my tree. I always start with lights, beginning at the top of the tree and winding them down towards the bottom, ensuring that the strands are set well back into the branches. Many people make the mistake of putting the lights on last. The plastic strands are then visible which ruins the effect - I have even seen this mistake on the pages of a top interior design magazine. I prefer clear lights and have used two sets on this relatively small tree. Professional decorators always advise to use as many lights as your budget can afford - in this case 'less is not more'.


Next step for me is baubles. I am using a traditional colour scheme of red, green and gold. I have more red than gold baubles, so I choose to use these first, ensuring that they are spaced evenly around the tree - don't forget to decorate the back of the tree too! These baubles are not glass and although I would prefer to have glass, because I have tile floors I have opted for plastic - this also means my younger children can help hang the tree ornaments without any risk to themselves or financial loss to me when they inevitably drop some!


I then use the gold baubles and space them in between the red baubles. If you are using a silver scheme, consider buying more silver baubles than your other chosen contemporary colour. If next year you change your couch or soft furnishings or decide you do not really like the purple colour scheme you chose this time you can go out and buy more baubles in a different colour that also works with silver. I have more red than gold because I found several sets in the Christmas sale at Spotlight last year for a drastically reduced price!


Once the baubles are in place I move onto the hanging ornaments. I have quite an assortment of tree ornaments that I have collected over the years. Each year I add a few more to my collection. I usually buy them in the post-Christmas sales. As much as I love some of the contemporary designs and colours for Christmas, I resist the temptation to purchase ones which do not work in with my traditional tree. I have a few novelty angels but even some of the cute ceramic children's tree ornaments (such as Winnie the Pooh characters) do not look quite right with my gold mesh reindeer and Russ angel figurines.


The ceramic airborne 'St Nicholas' is one of my favourite tree decorations but the wooden heart decoration reminds me of the person who Christmas is really about and the reason why we celebrate. Jesus who lives in my heart will always be the focus of my family's Christmas!


This is my tree with the baubles and most of the special decorations in place. The garlands of beads that I wind onto cards each year are to go on next and need to be unravelled. Some have fallen off in the storage boxes and become tangled, untangling them is one of the most time-consuming tasks - never mind the girls enjoyed decorating themselves with all the strings of sparkly beads. So much more glamorous than tinsel! I personally, have an aversion to tinsel - sorry for those of you who love it but I always advise others to 'lose the tinsel' and I once put up a sign on my door for one of my seminars 'You are now entering a Tinsel Free- Zone'! I'm not sure why I dislike tinsel so much - perhaps it was the straggly tinsel that went onto the tree in my childhood home that overshadowed the beautiful vintage glass ornaments or the fact that my dad used to wind it around the television - this is one item in my home which I would never choose to accentuate! Neither do I use spray on snow on the windows - this is Australia for goodness sake and it is totally unseasonal! It is also why Frosty the Snowman never makes an appearance! My mother once made a snowman covering a plastic wastepaper basket with cotton wadding and she brought it out every year to sit next to the tree. I think she thought it would delight us children and he was rather amusing, very kitsch and quirky (he also turned yellow over the years!) but truth be told I was more fascinated and mesmerized by the delicate Polish glass ornaments with their pointed spires and glorious colours which shimmered when the lights reflected onto them - so the lesson is, don't think your children will prefer childish decorations, you may be surprised at their appreciation of some of the more beautiful tree decorations!


If you wish, you may choose to have a second tree just for your children to decorate to their heart's content. In some years I have had a second tree in the kitchen which we decorate with gingerbread stars, popcorn strands and homemade paper angels. This year the younger girls have helped construct paper cones for a special hand made advent calendar which I will show you in another post - still have to make a few more cones and buy some treats to go inside. These cones also make lovely tree decorations and can be filled with nuts or candy, so I thought I would share with you now, a few pictures for inspiration.


I'm aware that for some of you reading this that you are barely over all the preparations you made for Thanksgiving and are now only thinking of pulling out the boxes of Christmas tree decorations. Perhaps you do not even set up your tree until Christmas Eve! Each family and different countries and cultures have their own traditions. I do love the stories of Victorian Christmases of days gone by, when the parents would send their children to bed and then later on the true Eve of Christmas, would call down the children to see the Christmas tree, all decorated and sparkling with real candles lit just for that moment. How magical would that be!

I could not possibly leave decorating my tree until the night before Christmas and who knows I could even be in labour if my baby is a late arrival (and most of my children are!) I will show you more in my next post of how I trim the tree and add the finishing touches - the garlands, the bows, the Angel who sits atop and the displays that accompany my tree (not a cotton wool Frosty the snowman of course!) It's time - lights, baubles, action!

With Love and Joy,
Ann